Search This Blog

27.7.12

4 HOW TO CHANGE JAVA APPLICATION ICONS WITH MOBILE PHONES.

Have you ever wondered how some people tend to change application icons? Have you ever wished to change the icon of your favorite applications to your personal image?

In this post,I'll be directing you on how to change all Java application icons using a Java/Symbian phone.

Before we begin with this tutorial,you should have these softwares ready on your mobile phone.
  1. BlueFTP/Minicommander
  2. Raw application file

HOW TO CHANGE APPLICATION ICON USING A JAVA PHONE.

Once you have gotten the necessary files,we are set to begin. NOTE»Raw file means the _JAR/.ZIP format of the application to edit.

Using BlueFTP... To make your work faster,locate the downloaded BlueFTP in your phone » App. Access,then change everything to “Ask First Time”. Now,follow these steps strictly so as not to get an error.

  1. Open/Launch BlueFTP and locate the Raw application file you downloaded.
  2. Rename the application from _JAR to .ZIP,but if it's already zipped,skip this step.
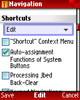
  3. Press menu(Left soft key) and scroll down to Create folder.Give it any name but it's advisable to use a name you can easily remember.
  4. Open the application in .zip format. Next,press menu again & click on “select all”.
  5. Now,press 1(to copy the selected items) » Go to the folder you created,open it and press 3(to paste the copied files).
  6. Next,locate your image and press 1
  7. Go back to the folder you created and press 3 to paste your image there.
  8. Locate the application's default icon in the folder[usually named i.png/icon.png] and write down the name.
  9. Delete the original icon and rename the image you pasted to the folder with the name you wrote down(It doesn't matter what format your image is).
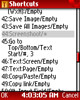
  10. Once you are done with that,it's time to re-pack the modified app. Press menu and click on “select all”.
  11. Select menu again and choose compress items(zip).A screen will pop-up asking you to name the zip file,you can choose to leave it as File.zip.
  12. Finally,after locating the newly zipped file,rename it from File.zip to File_jar.
  13. Now,exit the BlueFTP & locate your file,i.e File_jar and rename it to File.jar.
THAT'S ALL FOR BLUEFTP!!!

Minicommander to me,is the best file manager.That's why I've taken my time give this alternative process for those who do not fancy BlueFTP. To do this with Minicommander,follow the steps below.
  1. Locate the application on your phone and change the app. Access with the steps I mentioned for BlueFTP above.
  2. Launch M.C(MINICOMMANDER) and locate the application in .zip format.Likewise,open your folder in the second segment/column of the software.
  3. Once you open the .zip application,press *(to select all) » 5(to paste the selected files into the folder).
  4. Now,when prompted to select [yes],just press the left soft key.
  5. Go back to gallery and locate the image you want to use as icon.
  6. Press the left-soft-key to jump to the second column and locate the original icon(usually i.png/icon.png) &write the name somewhere.
  7. Press 8(to delete the icon) and toggle back to the first column.Now,press 5 on the image you want to use and confirm it.
  8. Once you've copied the image to the created folder,toggle to the second column and rename the image with the name you wrote down previously by holding "6".
  9. Next,to re-pack the files press * » Right-soft-key » 1 » 2.
  10. You will then see the root of the file.Select OK and rename the newly zipped file from .zip to _jar.
  11. Lastly,locate the file in your phone(without using a software) and rename it from _jar to .jar.
THAT'S ALL!!!.With this,you can change the icon of any java game/application as you please.

You can choose to use whichever software you feel will be easier for you.

If you don't get any of these steps or you have a comment/suggestion to give,do not hesitate to leave your comments behind.

24.7.12

1 HOW TO BOOT SYMBIAN PHONES FASTER.

symbian.jpgSymbian phones are noted for its slow booting. It can be very frustrating when you have to wait for minutes before your phone finally boots.

Sometimes ago,I wrote a post on how to disable installation in symbian phones each time the phone is switched on. Just like this issue of slow booting,applications re-installing automatically also adds to the time a symbian phone takes before it's ready for use.

Fortunately,symbian v3 and above users can now boost their phones faster anytime with this small but powerful software called “NEOREBOOT”.

Like I mentioned above,NEOREBOOT is a very powerful software which will allow you to boot your symbian phone faster than it used to.

If you are using symbian version3&above, I.e NOKIA N81, N82, N91, N92, N93, N95, E50, E51, E60, E61, E61i, E62, E63, E65, N80, E71, E75.. etc,all you've got to do is download it below & install it. When you launch it,you'll be prompted to restart your phone.Just accept and feel the speed at which your phone boots.

DOWNLOAD IT Note:-This file is zipped,so unzip it[20kb] & that's all.

23.7.12

1 HOW TO BLOCK UNWANTED CALLS ON BLACKBERRY.

In our previous tutorial,we discussed some blackberry tips to increase internet speed. So today,still on blackberry issue,we 'll be treating “how to block unwanted calls on blackberry”.

This might not be new to some people,but there are still people who don't know how to go about it.

In this tutorial,we'll be making use of a software called “Junk Call Blocker”. With this application,you can easily stop any number from disturbing you.

Having to keep your phone in silent-mode because of one un-important call,might make you loose important ones. Therefore,having this application on your mobile will help save the stress of silencing just one particular call each time the number calls you.

How To Block Unwanted-calls Using Junk Call Blocker.

Install the application on your device[Jump to download link!!!]. Open/Launch it,then select which phone number you'd like to block and save it.

Now,each time that particular number tries to call you,it will give an “unreachable” reply. Note»You can only block 10 numbers at once.

There are couple of options available in the software. Below are some of it...
  1. Autoblock junk call[default setting]→ With this,numbers in the list will show a warning when coming-in.
  2. Junk Call Blacklist→Numbers in the list will be completely blocked.
  3. Whitelist→This option overrules any number in the blacklist.
Download link. To download this software,visit http://appworld.blackberry.com/webstore/content/48846/ using your default browser. Instructions for downloading the software is available in the site.

DON'T FORGET TO SHARE THIS POST WITH YOUR FRIENDS.

20.7.12

2 BLACKBERRY INTERNET TIPS.

Is your blackberry internet connection too slow? Do you reside in an area with bad network? If YES,then this post is for you. blackberry bold.jpg

In this tutorial,I will be brushing over two topics which are »

  1. How to increase blackberry internet connection.
  2. and
  3. How to increase blackberry ping speed.

HOW TO INCREASE BLACKBERRY INTERNET BROWSER SPEED

There are few things you can do to significantly increase the speed of your blackberry browser.Below are some of the tips you can use to do that.
  • Turn image off» Downloading/loading images takes a whole lot of time.It strains your blackberry while loading them and as a result,slows it down. Therefore,disabling image-mode will help fasten the browser. To disable your browser's image,go to optionsBrowser configuration → Set ́show images̀ to “NO”. Next,uncheck “Use Background Images”.
  • Turn Javascript support off» Turning off Javascript can also help to increase your browser's load-speed.You can do that in the browser's configuration screen.

HOW TO INCREASE BLACKBERRY-PING SPEED.

If you find yourself in an environment with bad internet connection and you find it difficult to ping on your blackberry phone,this tip should make a difference.
  1. Go to your Settings/Option & switch on your “Wi-fi Connection”.
  2. Open your BBM and Start Pinging to see your messages being delivered faster than it was before.

Hope these tricks work wonders as you explore the internet. Comments & Contributions are highly welcomed,So please leave a comment behind.

15.7.12

5 PAGE-LOAD TIMER SCRIPT FOR BLOGGER BLOGS.

Have you seen websites displaying web-page load time? Do you want this feature in your blog? If yes,then Read-on.

In this post,I will be explaining how you can easily add this widget to your blog.

How to add load timer to blogger blogs

To add this widget to your blog,follow the steps below.

Step 1:

Login to Blogger & go to Design/Layout » Edit HTML[Always remember to backup your template.] Check the box next to Expand Widget Template and search for <head> by pressing CTRL+F. Once you get that,copy-paste the codes below directly after it.
<!-- page load timer --> <script type='text/javascript'> var d = new Date(); var starttime = d.getTime(); //Get the start time </script>

Step 2:

Find </body> in your template and immediately before that,copy-paste this code:
<!-- page load timer begins --> <script type='text/javascript'> var d2 = new Date(); var endtime = d2.getTime(); //Get the end time //Find the difference between the start and end times var totaltime = (endtime - starttime)/1000; //Round 2 decimal places var result = Math.round(totaltime*100)/100; //Output results to a&quot;P&quot; element document.getElementById(&quot;loadtime&quot;).innerHTML = &quot;Page loaded in:&quot; result &quot; seconds&quot;; </script> <!-- page load timer ends -->

Preview and Save template.

Step 3:

Login to Blogger » Design »Page element and select 'Add a gadget'. Next,scroll down till you find "HTML/JAVASCRIPT" and click on ADD. Now,copy-paste the following codes in it:
<!-- Widget portion --> <p id="loadtime">Your custom message goes here</p>
Finally,save widget and view your blog to see the load-timer. If you are not satisfied with the “Page loaded in:” that displays together with the load-time,simply change it in “step 2” above.

13.7.12

0 HOW TO ADD FAVICON TO BLOGGER BLOGS.

A blog/site with a favicon is considered more professional than a site which has not,as it gives your website its own uniqueness.

This feature has been long known with Wordpress blogs,but in this tutorial,I will be guiding you on ́how to add a favicon on your blogger blog`.

Before I proceed,I will like to explain what a favicon is,for the benefit of newbie bloggers who might have not come across this tutorial before.

What is a favicon?

Favicon was extracted from the word “favorite-icon”. It's that tiny image you see behind every website-title on your browser. For a better understanding,look at the top left-hand side of your browser→behind this blog's title,you will notice a small image(),right? That's what is called a favicon.

By default,all blogger blogs display blogspot's icon which we are about to change.

Can't see an image?

If you can't see any image,then it can only mean two things »
  1. Your browser's image is turned-off → Switch it on[Not all browsers].
  2. Your browser does not support favicon.
NOTE:-Not all browsers supports favicon e.g Internet Explorer 6.So,for the benefit of this tutorial,you should try using a higher version of Internet Explorer or some other browsers.

HOW TO ADD A FAVICON.

Below,I will be giving you the steps to take in order to add a favicon to your blog.

STEP 1→

  1. Visit http://tools.dynamicdrive.com/favicon(preferably in a new tab).
  2. Click on the image-browse box to generate a favicon from any image in your computer.
  3. Next,upload your image and click on “create icon”
  4. You will see a download button,click on it to download the generated image icon to your pc.

What to do with the generated icon?

Upload your generated icon to an image hosting site to get the url. I know many people find it very hard to get a .ico image hosting site,but after so many trials,I finally got one. So,to host your “ico” image file,GO HERE.

STEP 2→

Once you finish uploading your icon,copy the generated link and save it somewhere & follow the steps below.
  1. Login to Blogger» Go to Design/Layout » Edit HTML.
  2. Check the box next to Expand Widget Template.
  3. Search for <b:skin><![CDATA[/* in the <head> section of your template by pressing CTRL+F.
  4. Just before the code above,you'll see a similar code to the one below,so just replace it with the code snippets below→
  5. <link href='http://hostsite.faviconname.ico' rel='shortcut icon'/> <link href='http://hostsite.faviconname.ico' rel='icon'/>

    So,like I mentioned above,replace the red text with your generated icon url.
  6. Finally,SAVE your template & you are done.
NOTE↓ Your uploaded icon will take some time before it starts to display in your blog.In some cases it might use days,so be patient.!!!

10.7.12

5 HOW TO FIX YAHOOMAIL LOG-IN ERROR IN MOBILE PHONES.

yahoo logoFor some times now,logging into yahoo has become a problem for mobile users.Each time you try to log-in to yahoomail,you get the following error→ “We are sorry that you are having difficulty logging in.Please sign in from our desktop login screen and then try login again from our mobile login screen” If you have also been getting this message,then this tutorial is for you.

Below,I will be giving you the simple trick I used to solve this problem on my mobile phone.

  1. Visit http://login.yahoo.com/config/login using your mobile browser.
  2. You will see a computer version of the yahoo login page.
  3. Just input your ́username & password` accordingly and press the “login” key.
  4. Next,you will see your account-info page.Just select Homepage and Select 'Mail' from the next page.
That's all.Make sure you share this post with your friends as you might be of help to someone having similar problems.

8.7.12

8 HOW TO TAKE SCREENSHOTS ON JAVA PHONES.

Some days back,I gave a tutorial on how you can take screenshotsof anything displaying on your mobile using a small but powerful application called “screenshot”. Like I mentioned in that post,this software can only work for symbian s60 users.But hey,why should Java users be left out?!!!.

So today,I will be sharing with us another trick with which you can take screenshots on Java phones.

In this tutorial,we will be making use of this popular and one the world's most used mobile browser |OPERAMINI.| Yeah,that's right!!you can take screenshots using operamini.Though,not all operas take screenshot,this version does.

OPERAMINI WITH SCREENSHOT.

For the benefit of this tutorial,it would be better if you had a better understanding of this operamini[Opera mini Mod 4.21 beta9HandlerUI]

Features of Operamini4.21beta9UI

  • Application was modded by YKhandler
  • Cheat enabled->If you have a cheat you want to use,you can.And if not,it can work without one.
  • Application in .jar extension
  • Built in File manager
  • Powerful download ability
  • Screenshot embedded+ many more....
Due to difficulty in downloading the software from the main site,I 've uploaded it to another server[virus free]. |DOWNLOAD IT HERE!|

Download the file above » Install/Launch it and follow the instructions below to take screenshots with it.

How to take screenshots using operamini.

  1. First things first,Choose a folder to save your screenshots by going toMenu»Tools»Settings»General
  2. Scroll down to “Path for Saving Screenshots” and choose the path you want your shots to be saved. Save the settings.
  3. Go to Menu again,but this time,select Navigation
  4. Locate “Shortcuts” and click on “Edit
  5. Scroll down to Number “44” where you see “Screenshot/Empty”,click on it and press your desired shortcut there[You'll use this whenever you want to take a screenshot]
  6. Save modifications.
Press the shortcuts you inputed in the settings to be sure you made no mistakes.If properly done,the screenshot of the application's front page should be saved to the path you specified above.

Now anytime you want to take a screenshot,just press the shortcut,and you are done.

That's all!!!.Make sure you share this post with your friends... Again,here's the download link ~ Opmod421b9hui202 Don't leave without reading “HOW TO TAKE SCREENSHOTS ON SYMBIAN PHONES.”.

5.7.12

0 HOW TO TAKE SCREENSHOTS ON SYMBIAN PHONES.

Symbian phoneIn my earlier days of blogging,I came across several tutorials with screenshots as they would appear on a mobile phone& imagined how they got it.

I decided to surf the net in search of answers,but got really disappointed as almost all the tutorials I read said: “only computer users”can get screenshots.

operamini screenshot

After much search,I gave up.But just recently,I came across an application which is capable of taking screenshots of anything currently displaying on your phone's screen(Called Screenshot). It can also take screenshots of other applications running on your phone.. But the bad news is “THIS SOFTWARE WORKS ON ONLY SYMBIAN PHONES”.

How to use “Screenshot”.

Below,I will be giving the steps on how to use this software.
  1. Download the app. & install it on your phone{Download links below}
  2. Launch the application after installing it from your main menu.
  3. Choose what shortcut is more suitable for you by going to Options » Settings menu.[For the 3rd versions,the default shortcut is “Camera key”].
  4. Minimize the application by pressing “Back menu”
  5. So anytime you wish to take a screenshot,press the shortcut selected in the settings.
You can also choose what format the shots will be saved i.e either in JPEG, PNG, BMP or MBM formats.

Download links with list of supported phones.

Screenshot for SymbianOS (S60 3rd Edition) version 3.01 Supported devices »» 3250, N71, N73, N75, N76, N80, N81, N82, N91, N92, N93, N95, E50, E51, E60, E61, E61i, E62, E65, E70, E90..... Screenshot v3.01 (Signed version) » 95 KB |DOWNLOAD IT!

Screenshot for SymbianOS (S60 3rd Edition) version 3.03 Supported devices »» 3250, N71, N73, N75, N76, N80, N81, N82, N91, N92, N93, N95, E50, E51, E60, E61, E61i, E62, E63, E65, E70, E90..... Screenshot v3.03 (unsigned version) » 118 KB |DOWNLOAD IT! {Sign symbian applications.}

Screenshot for SymbianOS (S60 1st/2nd Edition) version 2.50 Supported devices »» 3230, 3600, 3620, 3650, 3660, 6260, 6600, 6630, 6670, 6680, 6681, 6682, 7610, 7650, N70, N72, N90, N-Gage, N-Gage QD. Screenshot 2.50 » 191 KB |DOWNLOAD IT!

Download the version of the software supported by your phone and enjoy while you screenshot your symbian phone.

Don't be selfish!!!Share this post with your friends on facebook,twitter etc.... If you need help using this software,don't forget to leave your comments behind!!!!!.

Also read “HOW TO TAKE SCREENSHOTS ON JAVA PHONES”.

2.7.12

16 CREATE CUSTOM PERMALINKS FOR ALL BLOGGER POSTS.

You might have noticed some blogs having shortened urls at the top/bottom of every post with a “Share this post” text. This is a very nice widget which can help increase your blog's traffic as visitors won't have to go through the stress of manually getting your posts url.

How to add shortened url to your blog.

In this tutorial,I 'll be making use of bit.ly i.e twitter's default service. bitly.jpgTo begin,you will have to create an account with bit.ly to get your API KEY.Once gotten,we can begin with the tut.

STEP BY STEP TUTORIAL.

Login toBlogger&go to Design/Layout » Edit HTML.[Always remember to backup your template.] Check the box next to Expand Widget Template and search for </head> by pressing CTRL+F. On getting that,Copy-Paste the code below directlyabove/before

<script type="text/javascript" charset="utf-8" src="http://bit.ly/javascript-api.js?version=latest&amp;login=USERNAME&amp;apiKey=YOURAPIKEY"></script> <script type="text/javascript" charset="utf-8"> BitlyClient.addPageLoadEvent(function(){ BitlyCB.myShortenCallback = function(data) { // this is how to get a result of shortening a single url var result; for (var r in data.results) { result = data.results[r]; result['longUrl'] = r; break; } document.getElementById("shorturl").innerHTML = "Share this link: &lt;input type='text'value='" + result['shortUrl']+ "' name='bitlyurl'/&gt;"; } BitlyClient.shorten(document.location, 'BitlyCB.myShortenCallback'); }); </script>

Replace USERNAME with the name you supplied while registering at bit.ly and also replace YOURAPIKEY with the key assigned to your account.

STEP 2»

Search for this line of code[CTRL+F]

<div class='post-footer-linepost-footer-line-3'>PLACE SCRIPT HERE</div>

Replace “PLACE SCRIPT HERE” in the code above with this»»

<b:if cond='data:blog.pageType =="item"'><form id='shorturl'/></b:if>

Now,Preview & Save your template.

You should now have a shortened url in all your blog posts. If you encountered any problem trying this,don't hesitate to leave a commen behind.

1.7.12

1 HOW TO DISPLAY YOUR NAME IN PLACE OF AM/PM IN TASKBAR.

This trick has been around for a while now,but for the sake of newbies who might have not come across this tutorial before,I will be giving detailed explanations here. WINDOWS.PNG With this trick,you can display your name in place of the default AM/PM in taskbar.

HOW TO CHANGE AM/PM IN TASKBAR

  1. Go to start »» Control panel.
  2. Next,select Regional and Languagethen click on Customize.
  3. Go to time-tab and change both AM&PM with your desired name.
Save your changes and that's all. Just like the default AM & PM,your inputed name will change automatically!!!
«PREVIOUS NEXT» ¤HOME¤
 
[GET THIS]