Search This Blog

29.11.12

0 HOW TO REMOVE/HIDE RECYCLE-BIN ICON FROM DESKTOP.

As we all know,trying to hide/remove the Recycle bin icon from the desktop is almost impossible,as Microsoft didn't provide with an easy solution to that.Recycle bin.jpg

Meanwhile,you might want to get rid of all icons on the desktop,in order to show a plain desktop-background.
So in order to do this,some steps will be taken...

In this tutorial,I will be guiding you on different ways/methods to go about this.

For Windows Vista,7 & 8 users.

Method 1:-
  1. Right click on desktop and select Personalize
  2. From the Personalize appearance and sounds window,click the “Change desktop icons” link on the left-hand side.
  3. Finally,uncheck the “Recycle bin” box.
  4. Note »
    To revert your actions,just follow the procedures above and re-check the “Recycle Bin” box.
Second Method...
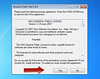
This method is a little complicated,so I'll advice you to adhere strictly to the steps below...
How to remove recycle bin icon from desktop
  1. Click on the “Start” menu icon and navigate to “RUN”(or use the search).
  2. Type regedit in the text area of the pop-up and click on “OK”.
  3. Navigate to HKEY_LOCAL_MACHINE\SOFTWARE\Microsoft\Windows\CurrentVersion\Explorer\Desktop\NameSpace
  4. Now,find and delete this registry key
    {645FF040-5081-101B-9F08-00AA002F954E}
If you feel the registry is too risky for you to edit,then do this ↓
  • Click on “Start” menu icon and navigate to “RUN”(or use the search).
  • Now,copy paste the following snippet of codes in the text-area
    Reg Delete HKEY_Local_Machine\Software\Microsoft\Windows\CurrentVersion\Explorer\Desktop\NameSpace\{645FF040-5081-101B-9F08-00AA002F954E}
  • When prompted to confirm the delete,just type y and select “OK” or hit Enter.
  • The icon will now be deleted from the desktop.
  • To undo hiding,just change “delete” from the code above to “add”[Without quotes].
That's all!!!
How To Remove The Recycle-bin;-For Windows XP Users.
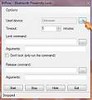
  1. For windows XP users,download & install “Windows TweakUI”.
  2. Launch / open TweakUI and click on desktop at the right.
  3. Now from the Desktop section, uncheck the “Recycle Bin” box and click “OK”
That'll be all.
Please do not forget to share this post with your friends, and likewise leave your thoughts behind!!!.

28.11.12

0 TRICK TO MAKE A COMPUTER`S KEYBOARD GO DISCO.

Have you ever wished you knew how to make your computer keyboard's-light go 'Disco'?
Have you longed for this feature in your computer, or you're just getting to know this for the very first time?
Then this post is for you...
Disco-light.jpg

The idea behind this trick is just to have fun / show off to friends, though some consider it rather annoying.
You don't need to have any coding/programming knowledge,as it's extremely easy to do.

In this tutorial,we'll be making use of this popular Computer application i.e Notepad.
Note:-
This illuminates & looks more fascinating in the dark.

Here's How To Do This.

  1. Open/Launch notepad [Right click on desktop » New » Text document].
  2. Copy - Paste the following codes into it ↓
    Set wshShell=wscript.CreateObject("WScript.Shell")
    do
    wscript.sleep 100
    wshshell.sendkeys"{CAPSLOCK}"
    wshshell.sendkeys"{NUMLOCK}"
    wshshell.sendkeys"{SCROLLLOCK}"
    loop
  3. Finally,save the file with a “.vbs” extension using any name.
    E.G Disco-light.vbs
  4. Now to start the effect,just double click on the newly saved text file to see the magic.
That's all.

If you think you don't like this effect,you can easily stop it by 

  • Hold keys “Ctrl + Alt + Del” and select Task manager
  • Locate wsscript.exe,select it and choose “End Process”.
  • Note : If your mouse doesn't respond any longer,just hold down the "Alt" key while you navigate.
Have Fun!!!

Also Read...

HOW TO EASILY FORMAT COMPUTER'S HARD-DRIVE USING NOTEPAD.
CREATE WORKING ANTI-VIRUS YOURSELF USING NOTEPAD.

27.11.12

0 HOW TO DISABLE ALL SYSTEM BEEPS.

You often hear annoying beeps emanating from your computer system when the Windows Pc is trying to warn/relay a message to you.
ComputerBeep.jpg

This sound often comes unexpectedly and sometimes catches the attention of others unnecessarily which is 'way' disturbing when in a Library or some other silent place.

Muting the computer in this case will not stop these beeps,as they are caused by an internal speaker.
So,what do we do in this case?

We simply disable all beeps...

Steps On How To Diable All Computer Beeps.

  1. Click on the “START” menu button and select “RUN”.
  2. In the pop-up window,type “Regedit” and select `OK`.
  3. From the Registry-Editor window at the left,navigate to HKEY_CURRENT_USER » Control Panel » Sounds
  4. Now, double-click on Beep at the right-side and change its value to No
  5. Click Ok, close the wizard and reboot the computer.
That's all.
To undo the changes,just follow the procedures above and change the value back to Yes.

26.11.12

0 HOW TO CUSTOMIZE Windows7 LOG-ON SCREEN.

Windows7.jpgThe Windows 7 Log-on screen is what we make use of almost every time to Lock our Computer, Log OFF, Swith User, Change Password, Start Task Manager...
But,you might want to restrict other's access to these options.

If you're new to the Computer world & do not know how to access this screen,just press CTRL + ALT + DEL.

So,in this tutorial,I'll be giving a detailed guide to customize the log-on screen of your Windows7 to meet with your wants.

Here's How...

  1. Click on “Start” button.
  2. In the search, type “gpedit.msc” and hit ENTER.
  3. Navigate to User Configuration » Administrative Templates » System
  4. In the right pane,locate Ctrl + Alt + Del and double click it to open.
  5. Next,you'll notice different options from the screen to Enable/Disable the log-on-options.
  6. They include
    Remove Change password, Remove Lock Computer, Remove Task Manager, Remove Log Off...
  7. Double click on any option to disable it and finally select OK
That's all.To confirm changes, just click on “Ctrl + Alt + Del” again.

23.11.12

12 TOP BLACKBERRY SECRET CODES.

As we ought to know,every device has its own hidden features which can only be unlocked with the help of secret codes.
Amongst others,we have treated some of them in the past.
They includeblackberry logo.jpg

In today's tutorial, we'll be listing some of the Major and most-popular of this widely-used mobile phone.
Here they are...

  1. The first is the code which works on virtually all mobile devices to check their IMEI number i.e *#06#
  2. Hold “Alt” down & press “RBVS” in the Address Book »To view the source code of webpages.
  3. Hold “Alt” & press “NMLL” »
    This is called the Decibel meter.
    It shows the phone's signal-strength in decibels instead of bars
  4. Address Book data structure rebuild.
    |This forces a data structure re-build in the Address Book.|
    Hold “Alt” & press “RBLD” in the Address Book to do this.
  5. Address Book file verification
    This checks the data in your Address Book for inconsistencies.
    Hold “Alt” & press “VALD” in the Address Book.
  6. To do a “Soft” Reset,which is thesame as Removing the battery for a few seconds.
    Press & hold “Alt”, then hold left-“shift”, then hold “Del”.
  7. To view the "Help Me! menu" for crucial technical information about the device,
    Hold “Alt” & (left) “shift”,then press “H”
  8. To view the Event-Logs,
    Hold “Alt” & press “LGLG”
  9. blackberry.com
    Note 
    The codes below will work mostly when you are viewing the home-screen.
  10. A or C »Phonebook
  11. S » Search.F » Phone's profiles.
  12. W or B » Browser. H » help.
  13. K » Locks the keys.
  14. L » Calendar.
  15. V » Messages.
  16. M » Messages folder. R » alarm.
  17. T »Tasks.
  18. U » Calculator.
  19. I » Applications.
  20. O » Options.
  21. P » Phone.
  22. T » Top of page (in browser).
  23. »B » Bottom of page (in browser).
  24. Space » Page down (in browser).
  25. D » Memo pad.
  26. U » Switch between hide/unhide in browsers title-bar.
  27. ALT + NMLL » To use numbers instead of bars for signal strength.
  28. ALT + Right Shift + Del » Hard reset.

20.11.12

13 HOW TO SPEED UP COMPUTER USING MOBILE PHONES AS RAM.

Do you have a Computer with less RAM size?
Does your PC hang every now and then?
Do you feel like throwing your Laptop in the waste-bin just because of its crawling state?

Well,if that's the case of your Computer,worry no more because we are about to turn all that to history.

You will quite agree with me that a computer tends to become less & less active compared to when it was first purchased.
This could be linked to several factors which cannot be listed here,but most especially when a heavy job is being done on it.

Running Computer.jpg

In this tutorial, we will be looking at some powerful devices that can be used to speed-up a computer 10 times over.
You don't have to spend some extra bucks to get these devices, as they are what we have around us.

Guess what... ,they are our Mobile phones, USB flash drives, Flash memory cards...
With the help of ReadyBoost, these devices can be used to fasten-up the speed of a 'frustratingly' slow computer.

Using ReadyBoost Application To Speed Up Computer.

Like I mentioned above,the whole idea behind using a Mobile device,Memory Card... as RAM[Random Access Memory] is made possible with ReadyBoost App. which is present in virtually all computers.

Here's How...

  1. Connect your Mobile Phone/Flash Memory card to the Computer using a USB chord or a Card reader.
  2. From the list of options that pops up on your Mobile phone,choose “MASS STORAGE”(For Blackberry users,choose USB Drive
  3. Note
    If you're using a Memory card,then you should skip the step above.
  4. Scroll to the bottom of the AutoPlay list that pops-up, and click on “Speed Up My System”.
  5. Now,the ReadyBoost window will be displayed. Just tick the option which says “Dedicate The Device To ReadyBoost”
  6. Next, check to ensure the "speed level" is at 4094MB, then Apply and finally click on OK
That's all!!! You can now feel the power of speed.
NOTE
If in any case the ReadyBoost window does not display,then it means your PHONE/SD CARD'S available memory is not up to the needed amount.

You can try getting rid of useless files from your phone / SD card until you have something like 950MB& above free.

TIPS
card reader.jpg
  • It's advisable you get a dedicated SD card for this purpose,so as not to lose important files.
  • Always remember to back-up your files to your system if in any case you'll be deleting some files on your Mobile phone.
  • For Laptop owners, it's recommended you use a Card-reader, because you can't always go about with your Phone connected with a USB chord.
If you need further help as regarding this tutorial,please do let us know.
Your contributions are also very valuable.THANKS...

19.11.12

0 HOW TO INSERT PICTURES IN FACEBOOK CHAT.

Chatting on Facebook these days, has gone beyond just typing to relay messages.
Different emoticons have been introduced over the years to help users easily express their mood while chatting with friends.emoticons.jpg

But,how good will it be to use a personal image to express our feelings?
Well,here comes the great news...
It's now possible to make use of images instead of the old-common emoticons available in the facebook chat.

In one of our previous posts,we discussed on how you can easily go offline on facebook chat without having to log-off / sign-out of facebook.
So,if you'd like to remain present on the chat,here's a quick tip to make it more fun.

How To Use An Image As Emoticon In Facebook Chat

  1. Visit Smileytime's homepage and navigate to Choose File.
  2. Click on it and choose a picture to upload.
    Once chosen,fill out the Captcha image and click Upload now.
  3. Next,COPY the codes displayed on the screen and PASTE it directly in the chat box.
  4. Finally,click on enter to see the image display live in the chat.
It's as easy as that,but if you'd like to display your profile picture or any other person's profile pics,you don't have to go through the stress of uploading it.
All you need do is follow the simple instructions below...

How to Use A Profile Picture as Facebook Chat Emoticon

Note »
You can use this style to display not only a users profile pics, but also that of Facebook pages and groups.

So,here's how.
  1. Visit the Profile page of the User/Page/Group which you want to use the pics.
  2. Get the Username/ID [learn how to get facebook Id(s) of facebook users]
  3. Write out the Username / ID of the user and add “[[ ]]” at the beginning and end of the username.
    E.g [[bayosola]] or [[Techfreeplanet]].
    Infact,you don't have to be friends before you can use the person's image
    E.G “zuck” for Mark Zuckerberg
  4. Finally, click Enter and the whole texts/numbers will be converted into an image.
THAT'S ALL.
So either way,you can easily use a special image instead of the regular facebook emoticons available.

Have Fun Chatting!!!.

18.11.12

0 HOW TO COPY/EXTRACT TEXTS FROM IMAGES EASILY ON COMPUTER.

Today,I'll be introducing to you a Pc software capable of copying/extracting text from any image.

Though there are some other applications capable of doing a fine job,for the benefit of this tutorial we'll be making use of “GT TEXT”

GT Text [Ground Truth Text].

Like mentioned above,GT Text is a 'freeware' software which allows its users copy text from picture files easily without having to pass through the stress of writing-out/re-typing every bit of words in a picture.

It comes handy when you're dealing with tasks involving images with words/quotes im-printed on it.
Sometimes,you might even take shots just for the texts in it e.g Taking images of an event's address on a poster/Bill board etc....

To use “GT Text”,just follow these easy steps...
  1. Visit the Software's download page [65MB] and download the latest version of the freeware.
  2. GT TEXT.JPG
  3. Once downloaded,install the program and run it.
  4. From the File manager that pops up,select which type of image you want to copy texts from and browse to the folder containing the image.
    Supported images include .jpg, .png, .gif, .BMP, & .TIFF.
  5. Next,select “Open” and when the image finish loading,click on the “Area Text OCR”
  6. Now,click and drag your mouse to highlight from the image the area you want to copy,then release the mouse.
  7. When released,an instruction pops-up.Just click on “Continue” to copy the highlighted section to the clipboard.
  8. Now,open your notepad and paste the text there.
If you'd like to extract the whole texts from the image,then you can easily do that by navigating to Tools » Copy Text From » Full image or by simply clicking on CTRL + F.
So either way,all text appearing on the image will be automatically saved to the clipboard.
Thereafter,you can do whatever you please with the text i.e editing,saving...

DOWNLOAD GT TEXT.[65MB]

THAT'S ALL. Hope you get the most out of the software.

15.11.12

0 HOW TO GO “OFFLINE” ON FACEBOOK CHAT WITHOUT SIGNING-OUT.

Chatting on Facebook can sometimes become so infuriating with different people trying to chat with you when you're not in the mood to.
Turning off the chat feature then becomes the only option.

However,in a case whereby you wish to chat with 'just' a particular person/group of persons,this becomes impossible as the whole chat has been disabled & thereby left with one solution which is to go “online”.

Luckily,its now possible to decide who to see you online/offline.
In this tutorial,we'll be discussing on how to easily go offline to a particular contact or some group of contacts without actually disabling the whole chat.

Here's How...

  1. If you want to go offline to so many contacts at once, the best way is to group them together in a particular list.
    To do this,
    • Search for “LIST” at the left corner of your facebook wall and click “More”
    • Next,click on the button which says “Create List”.
      In the pop-up window,name the group you're hiding using any name.
    • Now,input/enter the names of your friends you want to hide from and click “Create”.
    • After successfully creating the list,in to the chat box & click on the “gear button/options” and select “Advanced chat settings”
    • From the pop-up, select the option which says “All your friends see you except…” and enter the name of the list that was created earlier.
    • Finally,click on “SAVE” button to go offline to all friends included in the list.
    • NOTE »
      Whenever you feel like un-doing the hiding,just go back to the option which says “Advanced chat settings” and delete the list's name.Then select "Save".
  2. To go offline to just one person at a time
    Open your friend's chat window and click on the “gear button/options” and select “Go Offline To...”
NOTE »
Using the second method i.e Going offline to just one person, the person won't see you online,but you can still chat with them.

That's all.
Got any contributions and/or questions?,do not hesitate to leave your comments behind.

11.11.12

3 HOW TO EASILY FORMAT COMPUTER'S HARD-DRIVE USING NOTEPAD.

Notepad is 'sure' more useful than just creating & editing text files.
In some of our previous tutorials,we've learnt some stuffs we can use the Notepad for.
Amongst them is →

So today,we'll be talking on yet another great usefulness of Notepad,which is
“How To Format Your Computer's Hard-drive Using Notepad.”

PC Harddrive.jpg

Though,some people consider this trick as a virus to format a system,I don't think it is.
So,if you have an issue with your PC,and you think the solution is to format it,here's an easy way to do just that. Just follow the instructions below carefully.

Steps To Format Computer Hard-disk With Notepad.

  1. Click the “START” button » All programs » Notepad [OR just search for "Notepad" using the search option]
  2. Once notepad is launched, Copy-Paste the binary codes below into it
  3. 01100110011011110111001001101101011000010111010000 100000011000110011101001011100 0010000000101111010100010010111101011000
  4. Now,Save it by navigating to File » Save or by simply clicking on CTRL + S(Give it any name you like).
  5. Once you've saved the notepad,change the extension from “.txt” to “.exe”
  6. Finally,run/launch the saved file and your hard-disk will be formatted automatically.

TIPS.

  • If you can't rename/change the file extension,it means the Display of file extension has been disabled.
    To change it,go to My computer » Tools »Folder Options » View,then uncheck “Hide Extension For Known File Types”
  • Never try this unless you're sure you want to format your PC.
  • Always try to Backup your drive before formatting it.
For further questions pertaining this trick,do not hesitate to leave your comments behind.

ALSO READ 
Create Working Antivirus Yourself Using Anti-virus.
How To Format Computer Using Codes.

9.11.12

0 HOW TO LOCK & UNLOCK A COMPUTER USING MOBILE PHONE'S BLUETOOTH.

Today,I'll be introducing to you yet another great Pc software.
It's such a handy software which makes securing of Computer easier.

Each passing day,new applications are being created to make the usage of computer simpler and less complex.
Amongst them is Bluetooth Proximity(BtProx).

Bluetooth Proximity is an application designed for Windows Vista and Windows 7.
It detects a paired mobile device and locks/Unlock the Computer based on the number of seconds/minutes set.

With Btprox,you do not need to worry about leaving your Computer-system running whilst leaving the room as you're rest assured its locked out of intruders might.
One other thing which makes this software a must-have is its nice feature of unlocking when you enter into the room.
Though,this feature is not fully functioning in some Systems(as complained by users),it does work on most Windows 7_64 Bits(Tested).
Likewise,the founder of this app. has promised a fully functioning software in newer updates.

The whole idea behind this software is to help save the stress of racking the brain to remember the shortcut to lock the computer without passing through a whole lot of stress.

Requirements of BTPROX.

  • Bluetooth-enabled Mobile phone.
  • A computer with embedded bluetooth[Not sure if it works with an external bluetooth adapter].

How To Lock/Unlock Computer Using BtProx.

To begin with this tutorial,download the latest Bluetooth Proximity HERE
  1. Install the application on your Computer
  2. Run/Launch it.
  3. Minimize it and go to your Bluetooth Suite to pair your Mobile phone with the Computer[If done,then skip]
  4. Next to “Used device:”,click on “…” to select the paired Mobile device.
  5. Bluetooth proximity.jpg
  6. Once done,choose a default “Timeout” for your Computer to lock/unlock itself by directly inputing it or by clicking-on the Up-Down buttons.
    The minimum time is `0 min./60 sec.[No maximum]`
  7. Finally,click on “Start” to begin the lock command based on the number of minutes set for it to lock.
TIPS
  • Always set the timeout to 0 min. To save phone's battery life.
  • Try muting the Laptop so that intruders won't be notified of the lock due to the beeping sounds
  • When the specified mobile device is within range/the app. is running smoothly,the icon turns ORANGE.
    If it turns RED,then the device is out of range & the system is about to be locked automatically.
  • Whenever your switch-off your mobile phone's bluetooth,then the software sees it as “Out Of Range” and prepares to lock
  • To abort/end the application,simply click on the “STOP” button.
That's all.
With this,I believe the security of your Computer will be maximized.

7.11.12

0 HOW TO RUN JAVA(.Jar) GAMES & APPLICATIONS ON A COMPUTER.

Do you know you can run a Java application on your computer?
Have you ever thought of playing your favourite Java games on your Pc?

Now,all these have been made possible with "KEmulator".
Though,this might not be new to some old computer geeks,it indeed is for newbies.

KEmulator can be simply put as a Software designed to specifically run Java files on a computer.
As it is,'Java' is one of the most widely used programming languages in the universe.
Application developers tend to create more of Java files compared to developers in other platforms,and these files sometimes comes really handy which makes them un-neglectable.

Steps On How To Run Java Softwares On A Computer.

  1. Download KEmulator to your Pc[Link available below] and extract the contents of the zip folder to a new folder.
  2. Preferably,create a shortcut to the folder for faster accessibility.
  3. Next,run the application and you'll see a pop-up which looks exactly like the image below
  4. Now,to play or run a software,navigate to “Midlet” at the top-left corner of the screen and click to browse through your system.
  5. CHANGING THE SCREEN-RESOLUTION ~ At this point,newbies get frustrated with the default screen resolution which is by default set to display a Mobile phoneres. of 176 * 220 as they do not know how to tweak it.

    To change these values,go to View » Options and change it accordingly
    Note that you'll need to re-start the software for changes to take effect.

  6. Set a custom network proxy to make-use-of when you run a browser.This is also accessible from view > options.
  7. Lastly,you will need to configure the key-map to function as you deem-fit.
  8. [DOWNLOAD KEMULATOR HERE.]
Those are the main things to be known in the application.
If you need further assistance using the software,please use the comment box below.
«PREVIOUS NEXT» ¤HOME¤
 
[GET THIS]