Search This Blog

17.5.13

0 How to Change The Default Location of The Screenshots Folder in Windows 8

Taking of screenshots in Windows 8 has taken another dimension.Windows 8.jpg
Unlike the previous versions of Windows which requires the use of third-party Softwares like “Greenshot” or launching the default Snipping tool, it's now much more convenient using just one key combination.

By default, all screenshots taken by the new 'screenshot tool' in Windows 8 are saved in the directory C:\Users\\Pictures\Screenshots.
Nevertheless, you might want to move the default folder to a new directory in order to make it easier to locate and backup.

Therefore, in this tutorial I'll be putting you through the easy steps of going about this.
Note » This method works on both Windows 8 and Windows RT.
HERE'S HOW TO GO ABOUT IT...

  1. Open the Windows explorer and navigate to C:\Users\\Pictures\Screenshots - Replace "" with your Pc's User name.
  2. Right-click in the 'Screenshots folder' and select Properties from the list of options in the popup menu.
  3. Click the “Location” tab on the "Properties" box and then click on the “Move” button.
  4. Navigate to the NEW folder you wish to use as the DEFAULT folder and then click Select Folder.
  5. Click “OK” to accept the new changes.
  6. Finally, you'll see a Move folder dialog box asking if you want to move all existing files from the previous folder to the new default folder.
    Click ‘Yes’ to accept or ‘No’ to cancel it.
And, that's it...

To restore the default location i.e C:\Users\\Pictures\Screenshots,

  • Navigate to the newly assigned/custom folder
  • Right-click inside the folder and select “Properties” from the pop-up menu.
  • In 'Location' tab, click Restore Default.
  • (The previous/default Screenshots folder path will be inserted into the edit box) - Click ‘OK’.
  • A dialog any will appear asking if you want to create the Screenshots folder - Click ‘YES’
  • Finally, you'll be asked if you want to move all files in the old location to the new location i.e The original location - Click ‘YES’
    Note:-
    Since the Custom Screenshots folder is probably opened,you could get a warning stating that the location's not available. - Click ‘OK’ and restart the Window's Explorer if it crashes because of this.
If you don't seem to get a step or anything in this tutorial, kindly leave a comment behind
(Do not Spam).

4.9.12

39 HOW TO TAKE SCREENSHOTS ON COMPUTER.

This post can be said to be the third-part on Screenshots-taking,with part 1 & 2 being “How to take Screenshots on Java and Symbian phones.
Though,those two posts specifically talked about taking screenshots on mobile phones.

In this tutorial,I will be taking you through the flight on “how to take screenshot on both Windows & Mac OS”.
So,fasten your seat-belt & let's begin…

How to Take Screenshot in Windows.

There are couple of ways to capture a screen in Windows.
So,the easiest of them is what we will be going through here.
  1. The first is by using the default screen-capture key on every computer,i.e The PrtScn on your keyboard.
    Locate it & let's start.
    • To take the shot of everything currently displaying on the screen including all open windows,press PrtScn.
      This will be automatically placed in the Clipboard.
    • To capture just the active window,press Alt+PrtScn.
    • Now to save the shots,open Microsoft paint by navigating to
      Start » Programs » Accessories » Paint and paste it there.
    • Next,select “File”from the top menu and choose “Save as”
    • Finally,give it any name you want and choose a directory to save the image.
  2. The second method involves using the “SPINNING TOOL”.

    This tool is by default part of both Windows 7 & Windows vista.

    It is capable of capturing a specified area of a page instead of the whole screen as with the previous method.
    You can choose to use an amoeba-like[irregular] shape,a rectangle or capture the whole screen.

    How To Use “SNIPPING TOOL”.

    • Go to start » All Programs » Accessories » Snipping Tool.
    • Select a snipping type by clicking on the arrow next to “New” button.
    • Select the window or portion of the screen you want to capture using your mouse.
    • To highlight part of the screenshot,click on the pen/highlighter button in the menu.
    • Likewise,to capture a menu/drop-down menu,press ESC after you've launched the Snipping tool,then open the menu you want to capture & press Ctrl + PrtScn.
THAT'S ALL FOR WINDOWS.

How To Take Screenshot on Mac OS X.

Mac OS has an in-built screen-grabbing function,which enables you to take shots by clicking on some key combinations.

When these keys are pressed,a click sound will be heard,then the screen-shot will immediately be saved in .PNG format.

  • To capture the whole screen,press Cmd + Shift + 3 all at once.
  • To capture just a portion of the screen,press Cmd + Shift + 4.
    Just drag the crosshair that appears around the area to be captured.
  • To capture a specific window,press Cmd + Shift + 4 and immediately after that,hit the Spacebar.
    The crosshair will then turn into a small camera,highlighting all menus that can be captured.
That's all.
I believe taking of screenshots shouldn't be a difficult task for you any longer.

For contributions/questions,don't forget to leave your comments behind.

8.7.12

8 HOW TO TAKE SCREENSHOTS ON JAVA PHONES.

Some days back,I gave a tutorial on how you can take screenshotsof anything displaying on your mobile using a small but powerful application called “screenshot”. Like I mentioned in that post,this software can only work for symbian s60 users.But hey,why should Java users be left out?!!!.

So today,I will be sharing with us another trick with which you can take screenshots on Java phones.

In this tutorial,we will be making use of this popular and one the world's most used mobile browser |OPERAMINI.| Yeah,that's right!!you can take screenshots using operamini.Though,not all operas take screenshot,this version does.

OPERAMINI WITH SCREENSHOT.

For the benefit of this tutorial,it would be better if you had a better understanding of this operamini[Opera mini Mod 4.21 beta9HandlerUI]

Features of Operamini4.21beta9UI

  • Application was modded by YKhandler
  • Cheat enabled->If you have a cheat you want to use,you can.And if not,it can work without one.
  • Application in .jar extension
  • Built in File manager
  • Powerful download ability
  • Screenshot embedded+ many more....
Due to difficulty in downloading the software from the main site,I 've uploaded it to another server[virus free]. |DOWNLOAD IT HERE!|

Download the file above » Install/Launch it and follow the instructions below to take screenshots with it.

How to take screenshots using operamini.

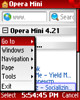
  1. First things first,Choose a folder to save your screenshots by going toMenu»Tools»Settings»General
  2. Scroll down to “Path for Saving Screenshots” and choose the path you want your shots to be saved. Save the settings.
  3. Go to Menu again,but this time,select Navigation
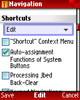
  4. Locate “Shortcuts” and click on “Edit
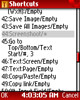
  5. Scroll down to Number “44” where you see “Screenshot/Empty”,click on it and press your desired shortcut there[You'll use this whenever you want to take a screenshot]
  6. Save modifications.
Press the shortcuts you inputed in the settings to be sure you made no mistakes.If properly done,the screenshot of the application's front page should be saved to the path you specified above.

Now anytime you want to take a screenshot,just press the shortcut,and you are done.

That's all!!!.Make sure you share this post with your friends... Again,here's the download link ~ Opmod421b9hui202 Don't leave without reading “HOW TO TAKE SCREENSHOTS ON SYMBIAN PHONES.”.

5.7.12

0 HOW TO TAKE SCREENSHOTS ON SYMBIAN PHONES.

Symbian phoneIn my earlier days of blogging,I came across several tutorials with screenshots as they would appear on a mobile phone& imagined how they got it.

I decided to surf the net in search of answers,but got really disappointed as almost all the tutorials I read said: “only computer users”can get screenshots.

operamini screenshot

After much search,I gave up.But just recently,I came across an application which is capable of taking screenshots of anything currently displaying on your phone's screen(Called Screenshot). It can also take screenshots of other applications running on your phone.. But the bad news is “THIS SOFTWARE WORKS ON ONLY SYMBIAN PHONES”.

How to use “Screenshot”.

Below,I will be giving the steps on how to use this software.
  1. Download the app. & install it on your phone{Download links below}
  2. Launch the application after installing it from your main menu.
  3. Choose what shortcut is more suitable for you by going to Options » Settings menu.[For the 3rd versions,the default shortcut is “Camera key”].
  4. Minimize the application by pressing “Back menu”
  5. So anytime you wish to take a screenshot,press the shortcut selected in the settings.
You can also choose what format the shots will be saved i.e either in JPEG, PNG, BMP or MBM formats.

Download links with list of supported phones.

Screenshot for SymbianOS (S60 3rd Edition) version 3.01 Supported devices »» 3250, N71, N73, N75, N76, N80, N81, N82, N91, N92, N93, N95, E50, E51, E60, E61, E61i, E62, E65, E70, E90..... Screenshot v3.01 (Signed version) » 95 KB |DOWNLOAD IT!

Screenshot for SymbianOS (S60 3rd Edition) version 3.03 Supported devices »» 3250, N71, N73, N75, N76, N80, N81, N82, N91, N92, N93, N95, E50, E51, E60, E61, E61i, E62, E63, E65, E70, E90..... Screenshot v3.03 (unsigned version) » 118 KB |DOWNLOAD IT! {Sign symbian applications.}

Screenshot for SymbianOS (S60 1st/2nd Edition) version 2.50 Supported devices »» 3230, 3600, 3620, 3650, 3660, 6260, 6600, 6630, 6670, 6680, 6681, 6682, 7610, 7650, N70, N72, N90, N-Gage, N-Gage QD. Screenshot 2.50 » 191 KB |DOWNLOAD IT!

Download the version of the software supported by your phone and enjoy while you screenshot your symbian phone.

Don't be selfish!!!Share this post with your friends on facebook,twitter etc.... If you need help using this software,don't forget to leave your comments behind!!!!!.

Also read “HOW TO TAKE SCREENSHOTS ON JAVA PHONES”.

NEXT» ¤HOME¤

 
[GET THIS]