Search This Blog

29.10.12

3 HOW TO USE SYMBIAN PHONES AS HOTSPOT TO BROWSE THE INTERNET ON COMPUTER.

Connecting a computer to the internet is becoming lot more easier day-after-day with the development of new & great Softwares.Connected devices over wifi.jpg

In a post sometimes ago,I shared with us » “How To Connect A Computer To The Internet Using An Android Device.”
So,you don't have an Android Phone?,don't worry.
In this post,I'll be sharing with you yet another great software which works on Symbian S60 phones..
It's called “JOIKUSPOT”

JOIKUSPOT.

Joikuspot.jpgJoikuspot is a software-solution that simply helps to turn a Symbian Phone to a secure mobile WLAN(Wireless Local Area Network) Hotspot,i.e With Joikuspot,an S60 phone is converted to an open Wifi/Wlan Hotspot which can be used to connect a Computer to the internet to surf the web using a “Joikuspot generated mobile wifi access point”.

It was developed by JoikuSoft,with series of updates ever since its creation in 2008.

While installing the app.,you'll be prompted to select a language which is best understood by you.
Some of the featured languages include »

  • English (U.K & U.S.A)
  • French
  • German
  • Spanish
  • Italian
  • Swedish
  • Danish
  • Norwegian
  • Finnish
  • Portuguese
  • Turkish
  • Russian
  • Dutch
  • Slovenian
  • Chinese
  • Japanese
  • Arabic
  • Hebrew
  • Ukrainian
  • Indonesian
  • Korean [and much more]

Using Joikuspot for internet connection is extremely easy.
It doesn't require Bluetooth connections,neither does it require the usage of USB chords.

Just follow these simple steps →
  1. Download Joikuspot to your phone (Download Link Below)
  2. Install it on your device (Click “OK” to by-pass all pop-ups)
  3. Once installed,you'll be required to reboot your phone.
  4. Launch the application and select a valid Access point to turn your phone into a Wifi hotspot[3G Modem].
  5. Scan for “Open wifi networks” using your high-grade desktop/laptop.
  6. Once found,select “Connect” and you're ready to surf the net on your computer.
Note »
It's necessary for you to have data bundle on your sim-card for Joikuspot to work.

Some of the supported phones include
Nokia N8, E7, C7, C6, N900, E51, E52, E55, E60, E61 , E61i, E63, E65, E66, E71, E72, E73, E75, N78,N79, N80, N97, 808, 5800 and much more.

[DOWNLOAD JOIKUSPOT PREMIUM VERSION 3.10]
(Get the upgraded version from Nokia Ovi-Store)

That's all.If you're not clear with anything,please do not hesitate to use the comment box below.

ALSO READ
“How To Connect A Computer To The Internet Using An Android Device.”

27.10.12

0 HOW TO READ PDF FILES ONLINE.

It's a clear-cut fact that reading of “Pdf” files nowadays,isn't something which requires much technical dexterity to carry out,as almost all new modelled devices come with an embedded Pdf reader.
pdflogo.jpg

Likewise,third-party softwares are available to perform this task on devices which do not posses the feature.
But,how about previewing these files before actually downloading them on our mobile phones?

While surfing through the net,I came across this cool feature of Google which enables us to read pdf files online using absolutely any type of browser.

With this trick,you don't have to worry about downloading some junk pdf-files anymore.

Here's How…

  1. The first step is to get the url of the pdf file to read [Address should end with a “.pdf” extension]
  2. Visit http://google.com/gwt/x using any browser.
  3. Copy-Paste the address of the e-book to read(.pdf) in the text-box provided.
  4. If you would like to hide all images embedded in the ebook,just check the box which says “Hide Images”.
  5. Finally click on ́Go` button to load the pdf file.
  6. (Try out this file as an example »
    http://www.grandmascraftguides.com/basichtml.pdf)
It's as easy as that.
The page loaded will be the mobile-formatted version which supports any type of mobile phone.

Please,don't forget to share with your friends and also share your experience with others!!.

26.10.12

0 BEST ANTI-MALWARE SOFTWARES FOR SYMBIAN PHONES.

While downloading and installing different applications on mobile phones, it sometimes becomes exposed to viral attacks.

Securing the phone,thereby becomes essential at this point.
Just as the saying goes,“Prevention is better than cure”,
It's better to guard against these attacks than searching for an engineer to format the phone.

In this tutorial,I'll be giving you a list of Anti-virus(es) to secure your Symbian phones with.

  1. Netqin Anti-virus.
    As at the time of publishing this post,this software can be said to be the best amongst others.
    It possesses so many great features which makes it outstanding from others.
    Below are some of Netqin's features…

    Features Of Netqin Anti-Virus.

    • Apart from the normal “Full scan” feature,it has the ability to scan specific files/folders on a mobile phone,which makes it relatively faster.
    • It lets users update the “Virus DataBase” easily to provide 99.9% protection against latest virus threats.
    • It has the “Safe mode” function which when clicked-on,closes all Non-system applications to return the phone back to its normal state.
    • An Anti-lost tab is also present to help guard against easy data access and phone usage in case the phone gets lost[Avialable for to Pro members only].
    • “Contact Backup” ability which saves all phone contacts.
    • “Network Firewall” tab where you can manage all phone internet connections from[Allow/Disallow specific application's access to the internet.]
    • Get full information about all app. installed on the phone,allow/disallow auto-boot of specific app. from the “System manager” tab.
    • Get logs of all activities performed on the software.
      AND SO MUCH MORE WHICH I CAN'T FINISH MENTIONING…
      [DOWNLOAD IT HERE]
  2. Rising Anti-virus.
    This is another great functionality software which does not only guard against malwares,but also empowered to perform other genius functions.

    Features of Rising Anti-Virus.

    • It comes in two languages i.e English & Chinese.
    • It has a more customized scanning ability to Netqin,as it allows you to choose whether to scan…“Running Processes”,“Phone memory” or “SD card”.
    • It has the ability to block calls when set to do so.You can keep Blacklist/Whitelist contacts and decide to receive calls from just numbers present in the Whitelist.
      In other words,you have the ability to block specific numbers from calling your mobile phone.
    • You can protect certain files on your phone directly from this software,as it renders it un-usable.
    • Finally,this app allows the viewing and managing of all running Processes on the smart-phone.
      [DOWNLOAD IT HERE.]
  3. Kaspersky Mobile Security (KMS)
    This is also one of the greatest mobile anti-virus of all time.
    Just like the others,it possess so many great features which we'll be brushing over…

    Features of K.M.S

    • Just like the above mentioned softwares,it also allows for customized scanning.
    • Amongst others,it has an option to unzipping archives in order to search for any form of malicious codes
    • With this software,you can scan all bluetooth-recieved SMS & MMS.
    • You can set the app. to start a full scan anytime.
      Though,this feature in present in others,it is more customizable in KMS.
    • It also possess an Anti-theft function to guard against private information leakage in case of theft.
    • It has a “Gps Find” option to track mobile phone down when lost/stolen.
    • Unlike R.Antivirus software above,KMS has both Sms & Call filter ability which lets you receive calls & sms based on the compiled Black/White lists
    This application possesses much more functionalities,but those are the key features.
    [DOWNLOAD IT HERE]
There are so many others,but in my perspective,the above mentioned comprises of all key-features of those other anti-viruses.

24.10.12

6 HOW TO EMBED “WINDOWS MEDIA PLAYER” IN BLOGS.

Writing a great article sometimes,isn't complete without embedding a video and/or an audio file to it.

It is highly required when you are posting a practical tech-related tutorial or most times on a news niche,whereby the file makes the post even more explanatory.

So,what if you have the link to a video,how do you embed it in a blog(post)?

In this tutorial,I'll be showing you two easy ways to embed the Windows Media Player in a blog to stream live videos & audio files for visitors to easily watch and listen to.

[Video adapted from google.]

Here's How...

  1. The first way is by adding the media player as a gadget in the sidebar.
    • Login to Blogger.
    • Navigate to Layout » `Add a gadget` » HTML/JAVASCRIPT
    • Copy-Paste the code below and save the widget.
  2. The second method is by embedding the player in each blog-post.
    This can be done by pasting the code below in each post.

Here's the Media-player's code...

<embed type="application/x-mplayer2" pluginspage="http://www.microsoft.com/Windows/MediaPlayer/" name="mediaplayer1" ShowStatusBar="true" EnableContextMenu="false"
autostart="false"
width="350"
height="250" loop="false"
src="VIDEO/AUDIO LINK" />

CUSTOMIZATION.

Change the settings of this player to suit you (Optional).

Autostart→ Change this value to "True" if you want the video/audio to start streaming automatically upon visiting the post[Not recommended].
Width/Height→ Change these values respectively to suit you taste.
Loop→ Force the video/audio to loop constantly.

That's all.Just make sure you get a valid url.

3 HOW TO ADD HTML ENCODE/DECODE TOOL WIDGET TO BLOGS.

There are times whereby you might need to post an Html tag as plain text most especially for bloggers in “Blog niches”.
It is also needed when a visitor has to write some codes in the comment box.

Although,Blogger has really made it easier to post “html” codes as plain text in the New blogger dashboard,it still isn't helpful in situations when you need some other tags to function in a post.
So,to solve this,a tool has been provided by Centricle.com to make posting of codes easier and faster.

Here's How It Works...

When a html code is inputed in the textbox,the “Encode” button needs to be pressed,and the result when posted,is shown as live codes.

To integrate this widget in your blog,just Copy-Paste the following code snippet preferably into a Page[Learn how to create pages on blogger.]

Here's the code...

<form action="http://centricle.com/tools/html-entities/" method="post" target="blank">
<fieldset>
<input value="y" name="s" type="hidden"/> <label for="pad">Convert text to HTML entities and vice-versal:</label> <textarea id="pad" rows="15"cols="60" name="pad"></textarea> <input value="Encode" name="submit" type="submit"/> <input value="Decode" name="submit" type="submit"/>
</fieldset>
</form>

Live Demo

That's all.If you need further information about the usage of this tool,do not hesitate to leave a comment behind.

23.10.12

0 HOW TO ADD A “PRINT PAGE” BUTTON TO BLOGGER BLOGS.

Adding a “Print Page” button to a blog is another way of generating little traffic to it,as visitors are given the option to print an entire article without stress,and by so doing can boost the traffic of your blog through Word-of-mouth,online forums etc.

So,if you'd love to include this button on your blog,this post will show you how…

  1. Login toBlogger.
  2. Navigate to Templates » Edit HTML[Always remember to backup your template.]
  3. Check the box next to
    Expand Widget Template
    and search for </head> by pressing CTRL+F.
  4. Next,Copy-Paste the code below directly above/before it.
  5. <style type="text/css" media="print">
    #noprint {display: none;}
    // Hide unwanted elements
    body {background:fff; color:000;}
    // Black text on White background
    a {text-decoration: underline; color:00f;}
    //Underline Hyperlinks in blue}
    </style>
  6. Once done,search(again) for <p><data:post.body/></p>
  7. When found, Copy-Paste the following code snippet directly below/after it.
  8. <a href="javascript:window.print()">Print Page</a>
  9. Preview the template to avoid errors and thereafter, Save it.
That's all.

19.10.12

1 HOW TO AUTOMATICALLY DELETE FIREFOX HISTORY WHEN EXITED.

In the previous post,we discussed on “How To Delete Google Chrome Browser History Automatically” when browser is exited.
So still on thesame issue,we will be studying how we can do this on Firefox browser.Firefox.jpg

By default,Firefox browsers are set to save all Browsing history,cache & cookies,but we're about to change all that.
Though,all these can be deleted manually,it's much more better having the job done automatically

To do this,just follow the instructions below carefully…

  1. Launch Firefox browser
  2. At the top-left-corner,click on the Firefox button and select “Option” from the dropdown menu.
  3. Next,click on the “Privacy” and right below the “History” section,select Use Custom Settings for History.
  4. Check the box which states “Clear History when Firefox Exits”,then confirm it(OK).
So,if you'd like to further customize the browser to delete specific datas,just click on “Settings” which is right next to the option in the last step above i.e “Clear History when Firefox Exits”.
Finally,choose which datas to delete upon exiting the browser and “OK” it.

That's it.
Now,each time you exit your browser,all datas will be deleted without leaving any traces behind.

ALSO READ »HOW TO AUTOMATICALLY DELETE GOOGLE CHROME BROWSER HISTORY.

18.10.12

2 HOW TO AUTOMATICALLY DELETE GOOGLE CHROME BROWSER HISTORY.

Privacy is one thing every human being loves to have.
Browsing the net on a shared computer becomes a risk when it comes to securing secretive/personal informations.

Sometimes,we may even forget to log-out of an account before exiting the browser,thereby making such account-infos vulnerable to easy access by anyone.

To guard against this,some precautions needs to be taken to ensure that these informations do not leak in the slightest.

In this tutorial,I will be giving you the trick I use in clearing all my browser history and cache automatically upon exiting.
Even as a Cyber-Café owner,the privacy of your patronizers should be of utmost importance to you,so this tutorial should come handy.

Google chrome.jpg

Automatically Delete Google Chrome Browser History.

So,if you use Google chrome browser on your Pc,all you need do is follow these simple steps…
    STEP 1
  1. Launch Google chrome.
  2. Click on the wrench menu to select settings.
  3. From the Settings tab,click on “Advanced settings” and navigate to “Privacy settings”.
  4. Click on the “Content settings” button and check/tick the box which states “Clear Cookies and Other Site and Plugin Data When I Close My Browser”
  5. Once done,you can try it out to see all your privacy datas and browser history deleted each time you exit the browser.

STEP 2

Note,this step is not compulsory,but you might want to consider retaining a specific site's history i.e Each time you visit a specified site,all history regarding that site is not automatically deleted when exiting the browser.

To do this,follow the steps below »

  1. Click on the “Manage exceptions” button which is located below the “Cookies settings”.
  2. Include the URL of the site you want to keep in the exceptions box.
That's all.Now,everytime you exit the browser,the entire cookies,cache and history of all sites which are not included in the exceptions list will be deleted. automatically.

16.10.12

0 HOW TO COPY DATA FROM SCRATCHED CDs & DVDs.

Have you ever come across the error “Data not readable” while trying to recover/copy a data from your aged or scratched CDs and DVDs?
Have you ever wished you could get those important files back?,then worry no more…

This problem often surface when you are trying to use a scratched disk/a disk which has not been used for a very long time,thereby making the datas contained in it lost forever.

But,here comes the good news.
There is this Computer software I discovered which is powerful enough to help copy those datas which are embedded in such a disk.
It's called “COPYCAT”

Just as the name implies,this software copies all those datas from the disk directly into your system.

CopyCat.

CopyCat is a software developed by VCSoftware.
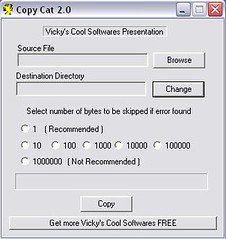
It helps to copy-out maximum bytes from a disk which an ordinary Windows copying cannot handle.CopyCat Screenshot.jpg

It skips totally-unreadable-bytes and extracts all datas which are still readable to the system for future referencing.

Features Of CopyCat.

  • It copies maximum data from unreadable Hard disks,Pen drive, Floppy drive, and other media drives.
  • It gives the option to skip bad area when found unlike Windows Copy operation which halts.
  • It copies data from highly damaged media ~ byte by byte.

TIP
From the image above,you will notice a command stating »
“Select number of bytes to be skipped if error found.”
Just choose 1 which is the Recommended value.

To get CopyCat on your PC,|FOLLOW THIS LINK.|

THAT'S IT.
Please leave your comments and reviews behind.

14.10.12

0 HOW TO USE AN ANDROID PHONE'S CAMERA AS WEBCAM.

Android Phones over the years,has really developed to an astonishing level with new features being added to every new model.
This has made the device handy in so many occasions.

In one of our recent tutorials,a tip was given on “How an Android phone can be used to connect a computer to the internet.”.

So in this Tutorial,we'll be learning another great tip of the Android Mobile.

webcam.jpg

Do you have a Computer without webcam?,
Do you have an Android Phone?
,then you need not buy a separate Cam again,because you can easily turn your device into a Webcam to chat with your friends on Facebook,Skype,GTalk etc.

All you need do is follow these simple instructions...

How To Turn An Android Phone Into Webcam.

Android logo.jpgFor the benefit of this tutorial,we'll be making use of an application called “SMARTCAM” which supports both Bluetooth and WIFI connection.
Here are the download links
SMARTCAM for ANDROID.
and
SMARTCAM FOR COMPUTER[Windows & Linux supported]

Get both Softwares for the respective devices and let's proceed...

Using Wifi Connection.

  1. Establish a connection between the Android phone and Computer.To do this,
    • Launch SmartCam on mobile.
    • Navigate to Menu » Settings » TCP/IP (Wifi) and input the Local IP address of your computer.
  2. Launch SmartCam on PC and set connection type in the SETTINGS to TCP/IP (Wifi).
  3. Turn-on Wifi on your Android phone and connect your phone to the network your Pc is connected to.
  4. Finally,select “Connect Wifi” from the Android application's menu.

If done properly,you should see an image of your phone on your desktop.

THAT'S ALL.

NOTE »
To chat using this application,in to your Chat application's preferences/settings and select “SmartCam” in video settings.

Is it Tricky?
Do you have a question or contribution to make?
Please let us know by leaving your comments behind.

0 HOW TO CHAT WITH FACEBOOK FRIENDS ON OPERAMINI.

Chatting on facebook with Mobile Phone has never been easier.
Facebook-mobile Logo.jpg
With the introduction of Facebook's Buddylist,you can easily get in touch with your pals without going through a whole lot of stress.

In this tutorial,I'll be giving you a quick tip on how you can chat with your Facebook buddys using Opera-mini.

All you need do is Copy-Paste the URL address below into your Opera's address bar to see your online friends live.

Here's The Link...
https://touch.facebook.com/buddylist.php

Note,this doesn't work on other browsers such as UCbrowser,QQbrowser etc
Only OperaMini[Any version.]

If you require any further information,please do let us know by leaving a comment behind.

12.10.12

0 HOW TO CONNECT A COMPUTER TO THE INTERNET USING AN ANDROID PHONE.

It's no longer a story that you can connect a computer to the internet via Mobile Phones,but “HOW” remains the question.
connect phone to computer.jpg

So,do you have a Computer & an Android Phone?, here's a quick one on how you can do just that.

Steps To Connect Pc With Internet.

  1. Connect your Android Mobile to the internet with your inbuilt browser (Wifi/Packet data).
  2. Connect Phone to Computer using a cable.
  3. usb cable.jpg
  4. Select Wireless & Networkfrom your Android phone's settings.
  5. Next,select Tethering and Portable hotspot.
  6. Finally,Check USB tethering & Portable Wi-Fi hotspot.
That's all.
You can now open your Computer's browser to browse the internet.

11.10.12

0 HOW TO WATCH VIDEOS ONLINE WITHOUT BUFFERING.

Many are times whereby you need to watch an important video online,but the network keeps f**king up.

It can be really infuriating when you have to pause the video just to load or leave it to keep buffering every few seconds.

Now,you might want to ask what the solution is?
Well,if you are addicted to watching Youtube videos,here is an easy solution.
All you need do is follow the instructions below.

For the benefit of this tutorial,you will have to download any of these Media players i.eReal player or VLC media player if not already installed on your computer.

Steps To Follow...

Before proceeding with this,visit Youtube or any other video sharing website and click on which video you intend watching.
Next,right click on the video to get the URL.
Once gotten,replace “www” with “m”.

USING REAL PLAYER.

  1. Launch/Open Real Player.
  2. Select File then “Open”.
  3. Finally,paste the copied url there to load the video.

USING VLC MEDIA PLAYER.

  1. Launch/Open VLC player.
  2. Select File » Streaming.
  3. Now,paste the copied URL in the window that pops-up.
  4. Finally,click on Stream button to load and play the video.
That's it!!!

IMPORTANT NOTE:
Since the video is formatted for Mobile viewing,it's highly compressed,so you may not enjoy it as you would when viewing directly.

10.10.12

0 HOW TO RECOVER ACCIDENTALLY DELETED MESSAGES ON MOBILE.

This tip is no longer a new one,but recently I was asked by a friend on `how he could recover a deleted message on his phone`,and I was like “So,this trick hasn't actually circulated”

Well,if you happen to have such questions,then Read on»

Before we proceed,note that “This trick doesn't work for SymbianV3 phones”
Now,make sure you have a File manager installed on your phone [X-PLORE or FEXPLORER]

Recovering Of Deleted Messages On Symbian Phones.

  1. Open/Launch X-plore.
  2. Navigate to C: if your messages are stored on “phone memory” OR D: if on external device.
  3. Locate System » Mail and click on it.
  4. Now,you should see different files/folders named 001001_s,0010001_s,00100001_s etc.
  5. Finally,open these files using the Explorer's default Hex viewer by locating it in the options {options»File»Hex/Text viewer} or by simply clicking “3”.
That's it.
TIP:
Once you locate the message you are looking for,copy/move it for easy reference.

If you have any suggestions/contributions to make,please feel free.

8.10.12

25 RANDOM BANNER WIDGET FOR BLOGGER BLOGS.

There are so many reasons you might want to add a banner to your blog site.
Adding a “Random banner widget” makes it better for any website.

It helps to manage space and is very useful in promoting affiliate links.
So in this tutorial,I'll be giving you an easy-to-use widget which can be modified to suit your taste.

Steps On How To Add Random Banner To Blogs.

  1. Login to Blogger.
  2. Navigate to Layout » “Add a Gadget” » HTML/JavaScript
  3. Next,Copy - Paste the code snippet below

    <script language="JavaScript">images = new Array(3); images[0] = "<a href='ADVERTISER'S URL' rel='nofollow'>
    <img src='URL OF BANNER'S IMAGE' border='0' height='60px' width='450px'> </a>";images[1] = "<a href = 'ADVERTISER'S URL' rel='nofollow'>
    <img src='URL OF BANNER'S IMAGE' border='0' height='60px' width='450px'> </a>"; images[2] = "<a href='ADVERTISER'S URL' rel='nofollow'>
    <img src='URL OF BANNER'S IMAGE' border='0' height='60px' width='450px'>
    </a>";index = Math.floor(Math.random() * images.length); document.write(images[index]);
    </script>

  4. Finally,SAVE the widget and preview your blog to ensure it's working.
If you need further information about this widget,please leave your comments behind.

Also Read

HOW TO ADD ADVERTISE WITH US WIDGET TO BLOGGER.

6.10.12

0 HOW TO EDIT POSTS IN THE “NEW BLOGGER INTERFACE”.

The fact that the “New blogger interface” has been around for a while now can't be disputed.
After so many notifications from Google,it was finally disabled late last-month despite mixed feelings about it.

Myself as a person,I didn't want to believe that the “Old interface” was gone forever,making it very difficult for mobile users to manage their blogs.

Of a fact,the New interface is not suitable for a beginner to play with because its just so complicated and hard to use. Infact,there were cases of accidentally deleted blogs,and the inability to edit posts makes it worse.

But luckily,while carrying out some tests on maybe I could edit my posts,I came-up with a solution;Though,much more stressful than the way it was with the Old Dashboard.

Here's How...

Login to Blogger »» Posts.
Next,navigate to the post you want to edit and get its url.
E.g In UCBrowser,click on “1” then scroll down to select “Page Info”(as seen in the image below) and finally copy the address in “Link Address”.

Once you've gotten the post link,it will look like this ↓
http://www.blogger.com/blogger.g?blogID=5582915502189979689#editor/target=post;postID=372835895764398957;onPublishedMenu=publishedposts;onClosedMenu=publishedposts;postNum=4;src=postname

Now,delete the following from the address you get
;onPublishedMenu=publishedposts;onClosedMenu=publishedposts;postNum=4;src=postname and Copy-Paste it in your browser's address-bar.

UPDATE!(17-02-2013)

I just discovered without deleting the preceding text from the derived url,i.e onPublishedMenu=allposts;onClosedMenu=allposts;postNum=50;src=postname,the trick still works perfect.
So just get the post's url and paste in your browser's address bar.

That's all.
Kindly leave your comments,suggestions and questions behind!!!.

1.10.12

0 HOW TO LOCK AND UNLOCK MOBILE PHONES WITH FINGERPRINT.

Here's another great application with which you can secure your mobile phone.

It allows you to lock and unlock your mobile phone by just placing a finger on it.

Though literally,the software doesn't scan and save your finger-print,it locks and unlock based on the number of beeps you set in the application's settings when ANY finger is placed on it.

How Does It Work?

Like I mentioned above,the software will be set to a certain number of beeps which only you must know for security reasons.

Once the beeping is matched,will automatically unlock itself.
NOTE »
This software works on only Symbian touch-screen phones.

TIPS.
Set the beeps to a number you can easily remember and hard for others to guess.
E.g Do not set the beep to the number of letters in your name coz anyone can easily guess that.

DOWNLOAD IT HERE!

«PREVIOUS NEXT» ¤HOME¤
 
[GET THIS]